Monday, June 3, 2013

APPLE PIE ENCHILADAS


I came across this wonderful looking recipe on Facebook.  I had to share this with you.

1 (21 ounce) can apple pie filling
6 (8 inch) flour tortillas
1 teaspoon ground cinnamon
1/2 cup butter
1/2 cup white sugar
1/2 cup brown sugar
1/2 cup water


Spoon about one heaping quarter cup of pie filling evenly down the center of each tortilla.
Sprinkle with cinnamon; roll up, tucking in edges; and place seam side down in prepared dish.
In a medium saucepan over medium heat, combine butter, white sugar, brown sugar and water. Bring to a boil, stirring constantly; reduce heat and simmer 3 minutes.
Pour sauce over enchiladas and let stand 45 minutes.
Bake in preheated oven 20 minutes, or until golden.
Serve with vanilla ice cream
Photo: Apple Pie Enchilada

1 (21 ounce) can apple pie filling
6 (8 inch) flour tortillas
1 teaspoon ground cinnamon
1/2 cup butter
1/2 cup white sugar
1/2 cup brown sugar
1/2 cup water


Spoon about one heaping quarter cup of pie filling evenly down the center of each tortilla.
Sprinkle with cinnamon; roll up, tucking in edges; and place seam side down in prepared dish.
In a medium saucepan over medium heat, combine butter, white sugar, brown sugar and water. Bring to a boil, stirring constantly; reduce heat and simmer 3 minutes.
Pour sauce over enchiladas and let stand 45 minutes.
Bake in preheated oven 20 minutes, or until golden.
Serve with vanilla ice cream
From  Facebook-The Farmer's Wife.

Monday, May 20, 2013

HARD LOTION BARS


Hard Lotion Bars

I first heard about making a hard lotion bar from Practical Ideas for Practical Moms and then I saw them at Passionate Homemaking!  I had all the stuff I needed for them since I had been experimenting with making my own Natural Deodorant so I thought these would be fun to try too!  If you don't want to make your own you can buy them at MadeOn  These are great for those extra dry Winter hands and feet especially for people who get the dry cracked sores on them.  Below is the recipe I used!  Enjoy soft silky hands even in the Winter!

Hard Lotion Bar
4.25 ounces Beeswax
4.25 ounces Shea Butter
5.5 ounces Coconut Oil
70 drops of essential oil, optional

Melt ingredients in crock pot or double boiler.  Mix well,  add essential oils if wanted once everything is melted.  Using a turkey baster or small ladle pour into molds of choice.  Soap molds, flexible ice cube trays, mini muffin tins, Tupperware, whatever "mold" you can think of will probably work.  I used 2 small soap molds that I had hanging around but since I only had two and this made about 6-8 bars I put the molds with the melted lotion in the freezer so they would set up faster so I could pop them out and use the mold again.  It was a little tedious but worked pretty good.  After all the bars were made I wrapped them in wax paper just like you would a present.  Then if you want to get creative you can print up your own fun labels for them!  Lots of fun and makes a great gift for all those people in your life with rough hands! ;)


http://www.simplehealthytasty.com/2011/02/hard-lotion-bars.html
THANKS TAMMIE!

Sunday, May 19, 2013

FOOD WONDERFUL FOOD

Just thought I would show you a few things I have been working on today.  I guess I got up hungry or something........

My first project was making another batch of home made yogurt.   Its on the heating pad covered with a towel and a bucket on top to keep in the heat in.  It will be ready  to uncover and put in the frig in about another hour.   So no picture of that.  Just three more quarts of fresh wonderful yogurt.
 
 Number two project----- I decided we needed a fresh batch of bread.  So, out comes the Bosch mixer, found the recipe,   and gathered all the ingredients.   And a few minutes later, we had a huge batch of dough.   This is only my second time to do this,   and I  end up with one loaf larger than the others.  Go figure.  
   The kitchen was already smelling good form the aroma of the dough,  so I shaped the dough and put it in the bread pans to rise.     After 30 minutes or so , popped them in the oven and 25 minutes later............OMG!!!!!       Its Done !  The smell was heavenly.   My house smelled so wonderful!    And the bread, sliced up hot with real butter on it...................    Well there are no words to describe that.    It was wonderful.  

While nibbling on this off and on, I decided since it was 100 degrees outside, we might enjoy some frozen yogurt later this evening..
So out comes the cuisinart , and I just emptied the last of my previous batch of home made yogurt in a bowl, added sugar, milk, and vanilla.    Got the frozen bowl out of the freezer, added all the yogurt mixture, turned on the little machine and let it whirl away.   In about 30 minutes, we had frozen yogurt.    Of course we had to sample this as well.   We just drizzled  alittle frozen strawberry puree over the top and again..............OMG!   It was sooooooo good!


Maybe we might skip cooking the steaks and sausage on the grill.  Bread and frozen yogurt?  This sure looks wonderful and my mouth is watering right now.          Naw!     Start cooking the  steaks!!!

Friday, May 17, 2013


How to Make Your Own Sunscreen Lotion

      
I have a small list of things I never thought I would make myself, and sunscreen happens to be on that list. It feels good to prove myself wrong, and realize that yet another product that felt so elusive and out-of-reach to me is actually dead easy to make.
Last week, a friend and I gathered in my kitchen with our oldest daughters to attempt to create some safe and chemical-free, SPF 30 sunscreen... without fancy equipment, without any previous know-how, without an FDA stamp of approval.

First things first... do we even need sunscreen?

Most of the time, I would say no. Our family rarely uses it because I don't believe it is generally helpful or even wise to use frequently. Particularly for us, living in the gray West Coast, we need the Vitamin D desperately (and I recently learned that it takes us until September each year to get back up to optimal levels after the winter!).
Instead of frequent sunscreen use, we employ a lot of common sense tactics to stay safe in the sun.
Occasionally, though, I feel like it's the right move to pull out a bottle, to avoid burning during long periods of sun exposure (like a day at the beach). If you've been around this blog for long, you've probably already guessed that I won't use the conventional sunscreen products lining the store shelves. I want something safer for my family.

So what does "safer" sunscreen mean?

From my understanding based on what I've read, the safest sunscreens are those with the same types of natural ingredients that you would want in any other type of skincare product. Nourishing oils like coconut, shea butter, jojoba, almond, etc. and potentially other ingredients like green tea extract or other antioxidants to protect the skin. Minerals (zinc oxide being the most common) provide the actual barrier between the sun and your skin.
This is just a very short list, but these are some of the ingredients we want to avoid:
  • Oxybenzone (found in 65% of sunscreens)- a hormone disrupting chemical
  • Retinol palmitate (a form of Vitamin A- fine in the body, but probably harmful on skin)
  • Methoxycinnamate or Octinoxate
  • Padimate O/PABA
  • Nano or Micronized mineral particles
If you really want to learn more about what to avoid, and what to look for I would highly recommend the EWG Sunscreen 2012 Guide. In particular, take a look at the sunscreens that rated the best, and then some articles on sunscreen safety and efficacy, such as What's Wrong With the Sunscreen Protection Business,Health Agencies Question Sunscreen EfficacySunscreens Exposed: 9 Surprising Truths, and Does Sunscreen Damage Skin?.
Additionally, Katie at Kitchen Stewardship has done some amazing research into sun protection over the last couple of summers. Of particular interest are her posts Do Mineral Based Sunblocks Work?Sunscreen, Skin Cancer and Safety: How Much Do You Need?, and Natural Sunscreen Updates (on her VERY thorough and looong list of sunscreens that she has personally reviewed).

Which leads me to making my own sunscreen

This recipe intrigued me because it's the same basic list of ingredients in MadeOn's hard lotion bars, which are entirely pure and non-toxic (and which my skin loves). It's been adapted to create more of a smooth lotion texture, with the addition of zinc oxide power (not in nano or micronzied particle form), for UVA protection. If you're curious about the safety of zinc oxide, read more here.
It comes from the ebook, My Buttered Life: Summer Edition (which includes several other summer skin recipes, like bug repellant and after-sun skin conditioner). In the book, Renee addresses the issue of SPF and this is what she says:
According to an article on Badger BalmÊŒs website, zinc oxide should be 20% of the formula in order to get an SPF30. This recipe is right at 20% so this would be considered SPF30
Not bad. SPF 30 is as high as we really need. In my Skin Deep Database reading, I read that although many formulas claim even higher SPFs than that, they realistically may not be and provide a false sense of protection. If we think we need something higher, then maybe we shouldn't be out in the sun for that long.

Here's how we made our own sunscreen:

Our simple ingredients:
  • 1/2 oz. beeswax granules/pastilles (I believe we found this to be 1/8 cup when we converted it)
  • 1/4 cup shea butter (2 oz.)
  • 1/4 cup coconut oil (2 oz.)
  • 2 Tbsp. zinc oxide powder (1 oz.)
We added the two oils and then the beeswax to a glass bowl.
This is our makeshift double boiler, a glass bowl sitting on top of a pot with boiling water turned to a low simmer. It's a blurry picture, but I thought it may still be helpful to see how we did it. We just had to be very careful with the hot glass bowl when we lifted it off, but other than that, this worked fine.
Once the oils were melted, we removed the bowl (set it on a folded towel on the counter) and dumped in the zinc oxide powder.
The book had recommended a stick blender, but mine is broken and I couldn't find another one at the thrift store. So, I settled for using a regular hand mixer and it did the job just fine. The goal was to thoroughly blend in the zinc oxide until there were no clumps, and to whip the oils just a bit.
Once it was smooth, we poured it into glass mason jars.
The day we made it (after it cooled off) it had a thinner consistency. I took this picture on a cooler day, and you can see that it's quite a thick lotion now. I was worried that it might not rub into our skin well, but I shouldn't have worried.
This is how it looked as I first began rubbing it onto my daughter's arm, but within a few seconds it softened and went on very nicely.
I wondered if it would leave a pale, ghostly white look, but it didn't. You can see that the arm on the left is slightly lighter (this is the one with sunscreen). But, the difference isn't very noticeable.
I want to tell you that we've been using it in the hot sun with great success, but where we live (the gray West Coast) we've had so few sunny days that I haven't been able to properly test it out. I intend to as soon as we get some sun, and then I'll update this post with how it works for us. What I do know is that in the past we've had success with natural-brand mineral sunblocks, so I expect that we will have a similar experience with this one. If anyone else has tried this, I would love to hear how it worked for you!
Update: We finally got a day to try it! We used it at the park on a very hot, sunny day. After over an hour of direct sunlight, plus another 45 minutes of on and off sunlight, no one was pink in the slightest, not even the baby with his super-fair skin (and we weren't covered up, using hats, etc). Next I'll try it on a water day and update again. :)

Want to try making your own sunscreen?

The recipe came from this book, My Buttered Life: Summer Edition.
The oils and zinc oxide powder came from a DIY kit from MadeOn Skincare. Use code "sunscreen" to take $5 off the cost of a DIY kit (if you bought one yesterday, just email and ask for the discounted amount back).
She also shares some ideas for purchasing the products yourself in the ebook, if you wanted to buy them individually and not in the kit. Two websites that you could use for purchasing these ingredients are From Nature With Love, as well as Mountain Rose Herbs (but it looks as though they do not carry the zinc oxide powder, only the other ingredients).
You can also try viewing the videos that Renee has made, this one for making the regular sunscreen that we made, as well as this one for making a different version that goes in a pump.
POST FROM      http://www.keeperofthehome.org/2012/07/how-to-make-your-own-sunscreen-lotion.html      Thanks for the recipe Keeper of the Home.

Sunday, May 5, 2013

MEXICAN UNFRIED ICE CREAM

I can't wait to try this one.  This looks so good!!!!


Mexican "Unfried" Ice Cream
Skinnytaste.com
Servings: 4 • Size: 1 ball w /chocolate syrup • Old Points: 3 • Weight Watcher Points+: 4
Calories: 180 • Fat: 0.5 g • Carb: 36 g • Fiber: 1 g • Protein: 6.5 g • Sugar: 23 g
Sodium: 203 mg • Cholest: 0 mg  


Ingredients:

  • 2 cups fat free vanilla frozen yogurt (Stonyfield)
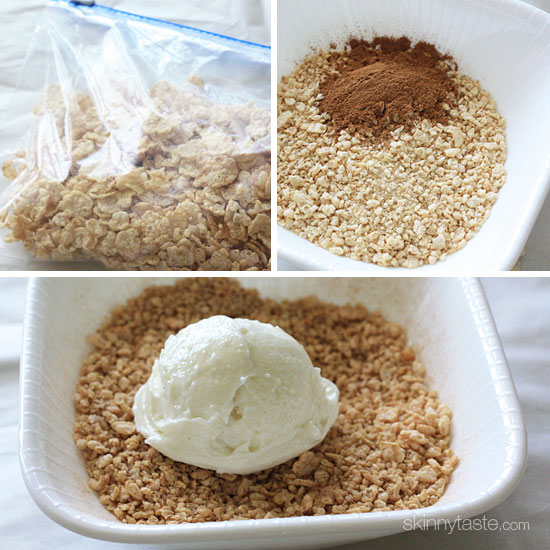
  • 2 cups Special K Cereal, crushed
  • 2 tsp ground cinnamon
  • 4 tsp Hershey's chocolate syrup 
  • cherry for topping (optional)
  • Truwhip for topping (optional)


Directions:


Line a baking sheet with parchment paper. With an ice cream scooper, scoop out 4 balls of ice cream 1/2 cup in size and place on the parchment-lined baking sheet.Freeze for 2 hours, or overnight, until the ice cream is very hard.


Meanwhile, in a shallow bowl, combine the crushed cereal and cinnamon. Using rubber gloves, roll the balls of ice cream in the cereal coating, packing them together into a smooth ball. 


Return the coated ice cream to the baking sheet and freeze until ready to serve.


To serve, drizzle with chocolate syrup on top with whipped cream and cherry, if desired.