Tuesday, April 23, 2013

AMISH FRIENDSHIP BREAD


Amish Friendship Bread

Image
This is the Amish Friendship Bread that gets passed around from friend to friend. It
includes the recipe for the Amish Friendship Bread starter, and gives complete directions for how to make it once your starter is ready. When you pass the starter on to a friend, make sure they understand that they will need to follow the instructions beginning at day one then will use the Amish Friendship Bread Recipe (with the oil, eggs, vanilla, etc.) on Day 10.
Amish Friendship Bread is not just a delicious andsweet bread, it’s also a way to bond friends by sharing countless loaves of bread baked in different kitchens that all began from the same bowl of simple ingredients. Choose a few friends and start this wonderful tradition, they’ll thank you for it!

Amish Friendship Bread Recipe

Day 1 - receive the starter (the recipe for the starter is below)
Day 2 - stir
Day 3 - stir
Day 4 - stir
Day 5 - Add 1 cup each flour, sugar and milk.
Day 6 - stir
Day 7 - stir
Day 8 - stir
Amish Friendship
Bread Recipes
Day 9 - stir
Day 10 - Add 1 cup flour, 1 cup sugar and 1 cup milk. Divide into 4 containers, with 1 cup each for three of your friends and 1 cup for your own loaves. Give friends the instructions for Day 1 through Day 10 and the following recipe for baking the bread.
After removing the 3 cups of batter, combine the remaining cup of Amish Friendship Bread starter with the following ingredients in a large bowl:
2/3 cup oil
3 eggs
1/2 tsp. salt
1 tsp. vanilla
1 to 1 1/2 tsp. cinnamon
1 cup sugar
2 cups flour
1 1/4 tsp. baking powder
1/2 tsp. baking soda
Using a fork beat by hand until well blended. You can add 1 cup raisins and 1 cup nuts (optional).
Grease two loaf pans with butter, sprinkle with sugar instead of flour.
Bake at 325 degrees F for 45 minutes to 1 hour (individual oven temperatures vary). Cool 10 minutes, remove from pans. Makes two loaves of Amish Friendship Bread.

Amish Friendship Bread Starter

This is the Amish Friendship Bread Starter Recipe that you’ll need to make the Amish Friendship Bread (above). It is very important to use plastic or wooden utensils and plastic or glass containers when making this. Do not use metal at all!
Ingredients:
1 pkg. active dry yeast
1/4 cup warm water (110 degrees F)
1 cup all-purpose flour
1 cup white sugar
1 cup warm milk (110 degrees F)
Directions:
1. In a small bowl, dissolve the yeast in warm water for about 10 minutes. Stir well.
2. In a 2 quart glass or plastic container, combine 1 cup sifted flour and 1 cup sugar. Mix thoroughly or the flour will get lumpy when you add the milk.
3. Slowly stir in warm milk and dissolved yeast mixture. Loosely cover the mixture with a lid or plastic wrap. The mixture will get bubbly. Consider this Day 1 of the cycle, or the day you receive the starter.
For the next 10 days handle starter according to the instructions above for Amish Friendship Bread.

Let your imagination loose with this bread.   It is so easy and so good.  My mouth is watering now.  I better get started!
Great Friendship Bread recipes and variations from Moms Who Think web site.  Thanks

Thursday, April 18, 2013

ORGANIC CELLULITE SPRITZ-GRAPEFRUIT & COCONUT OIL


Organic Cellulite Spritz ~ Grapefruit & Coconut Oil


An easy to make cellulite fighter that's literally packed full of skin smoothing, tightening and brightening benefits ~ all from just 2 ingredients!


Grapefruit essential oil is loaded with Vitamin C and Monoterpenes, both a have a stimulating effect and inhibit accumulation of toxins from liver and kidneys.


Apply topically to challenging areas or, add a few drops of Grapefruit EO to your water and enjoy these benefits!

____________________________________


1.  Detoxifies and reduces toxins in the body thereby reducing the chance of more fat forming.

2.  Helps to metabolize sugar.

3.  Helps to improve blood circulation.

4.  Burns excess fat efficiently.

5.  Helps increase collagen that firms up your skin.

6.  Reduces fluid retention which also contributes to cellulite build up.


So Easy to Make!


You'll need a 4 oz. glass spray bottle {HERE}, it works perfectly!  And, organic Fractionated Coconut Oil {HERE}, although...other light carrier oils such as almond oil and avocado work well too.


Add one 15ml bottle of PURE Grapefruit essential oil and top it off with the FCO.


After each shower or bath, pat yourself dry.  Before you moisturize, spritz your problem areas, massaging in completely, then moisturize.

Get ready for a happy surprise...not only will Grapefruit EO help you battle the bumpy parts, the aromatherapybenefits will brighten the task! 

Monday, April 15, 2013

Single Salve Packs Tutorial


Wednesday, March 14, 2012


These are the coolest things I have seen in a long time.    I Will have to make some of these with different slaves in them.   Too handy!!!

Single Salve Packs Tutorial

I saw this idea on a prepper website but I cannot remember which one so I can't credit them. If I find them, I'll link back to their site as they had some great tips on there. They used neosporin type salve to create their packets but since I use all herbal salves I and my friends make, I decided to cater these to using my own salve.

To make them you will need:
-drinking straws (clear are best so you can see inside)
-tea light
-needle nosed pliers
-scissors (forgot to photograph but you know what those are!)
-your choice of salves


Begin by poking your straw into your salve. Imagine how much is usually needed for a typical wound and fill it to that point.

Pinch the end of the straw with your finger to push the salve further into the straw and create an empty space. Using the pliers, grip that space, leaving a tiny bit of straw sticking out of the side.

Hold the straw over the tea light to melt the end. Slide your pliers to the end and pinch it shut. 

Gently squeeze the salve towards the sealed edge to verify your seal.

Turn the straw around and pinch the other edge as close to the salve as you can without squeezing the salve out the other side. Use your scissors to cut off the edge and seal as you did the other side, being sure to squeeze and check for leaks.

All finished! The straws I used gave me 5 individual packs per straw. These are perfect for storing in the first aid kit and will also be great for building a mini first aid kit to put in the kids' back packs for when they go hiking in the woods. To open, simply use a knife.

Optionally, you can use a sharpie marker to write what type of salve is in the tube. Since I used 3 different types, I wrote down their names on each. Be sure to wash the tubes in soapy water first to remove any salve residue so the marker writing will be permanent.


http://fieldoftansy.blogspot.ca/2012/03/single-salve-packs-tutorial.html
Dancing in a Field of Tansy

Sunday, April 14, 2013


Homemade Wild Orange Creamsicles

Homemade Wild Orange Creamsicles using doTERRA Essential Oils

Get ready for summer with a homemade, healthy, refreshing treat!
Ingredients:
1 Popsicle tray & sticks
1 cup orange juice (no pulp)
1 cup coconut milk
3 tsp honey
1/2 tsp vanilla extract
5 drops doTERRA’s Wild Orange essential Oil
DIRECTIONS:
Mix ingredients well and evenly distribute into Popsicle tray. Add sticks.
Freeze & Enjoy!

TUESDAY, AUGUST 23, 2011

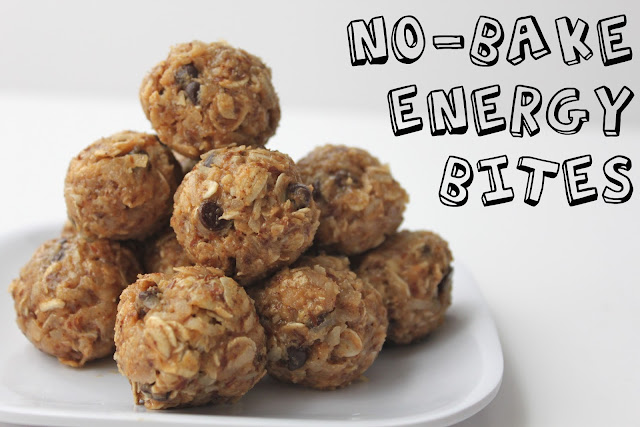
No-Bake Energy Bites {Recipe}


Please don't kill me but today I'm sharing one of our favorite snacky-time recipes...No-Bake Energy Bites.  It's an oldie but a goodie here at our house.  These little balls are freakin' awesome and just like a certain potato chip, you cannot eat just one.  I swear, I've tried and it's not happening.  


But for what it's worth, these can actually be called a healthy snack...YAY!  So go ahead and eat another one (or two) I won't tell.  The ingredient list is short and pretty good for you especially if you plan on using quality ingredients.  You can even substitute out the chocolate chips for something healthier but hey, isn't chocolate good for you in moderation?  Yup, I'm pretty sure it is...score!  So go ahead and make some of these and then share the love...shouldn't everyone be so lucky as to know about such a darn good and healthy little treat!

No-Bake Energy Bites  -print this recipe HERE-
(makes 18-20 bites)

1 cup oatmeal
1/2 cup peanut butter (or other nut butter)
1/3 cup honey
1 cup coconut flakes
1/2 cup ground flaxseed
1/2 cup mini chocolate chips
1 tsp vanilla

Mix everything above in a medium bowl until thoroughly incorporated.  Let chill in the refrigerator for half an hour.  Once chilled, roll into balls and enjoy!  Store in an airtight container and keep refrigerated for up to 1 week.

**PS.  Many of you have been asking about a calorie count on these...if you scroll through the comments section you can read various calorie counts from many of my awesome readers based off of different add-ins and size of the bites :-)

**PPS.  Many of you have commented about substitutions and YES!  you can substitute almost anything for any of the ingredients to work around food allergies, special diets, etc.  Soybutter, almond butter, cashew butter, sun butter, etc all works in place of peanut butter.  You can use creamed or liquid honey, or agave nectar or even maltitol syrup in place of the honey.  If you do not like or cannot eat coconut try some type of crushed cereal, wheat germ, whole wheat flour, granola, cocoa powder...the possibilities are really endless.  If you cannot find ground flaxseed you can buy it whole and grind it yourself in a coffee grinder or magic bullet or you can substitute any other dry ingredient in it's place.  Yes, the mini chocolate chips can be regular sized or carob or you can use raisins, cranberries, goji berries, or crushed nuts (almonds, cashews, walnuts, whatev) of some kind.  

I know writing out all these substitution possibilities seems silly but you will not believe the amount of comments and emails I get every day about "Can I use this instead of this? or "I don't like this ingredient, what can I use instead?" etc.  Just remember, if you make any substitutions you may have to play with the quantities of dry to wet a bit to ensure you have a mixture that can be rolled into balls (if you want to eat them in a ball-shape, you don't have to do that either!)  It's a really great recipe to play with so please don't worry about adding in a different ingredient if you cannot eat a particular one due to allergies, etc.  My motto is always, 'Just try it, you might like it' when it comes to making these.  We change it up depending on what is in our pantry and you can too!  Oh!  And you can also make these vegan and paleo-friendly, it's just a matter of buying the right ingredients, we do it all the time!  ENJOY!   


Alright, let's start with that gooey peanut butter, honey and some oatmeal and pour them into your mixing bowl.


Then add in a cup of coconut flakes, sweetened or unsweetened...your call.


Then you can add in your mix-ins.  I like to keep these somewhat healthy so I add mini-vegan chocolate chips and ground flaxseed.  But you could also add in some chopped nuts, dates, raisins and even switch out the flaxseed to wheat bran or something similar or even cocoa powder.  I love this recipe because it is pretty customizable to what you have in your pantry.


Then add in a teaspoon (or two) of vanilla!


Mix it all up and let it chill in your refrigerator for about a half hour.  


Then roll into balls and enjoy your little bites of heaven...or energy...depending on what you put in them!


Ugh, these are so addictive...do I dare call them energy crack cause they are really that good. These last about 2 hours at our house, I even catch Noah and Penny sneaking into our fridge to grab them when I am supposedly not looking.  Don't they know I have eyes in the back of my head?  ;-)  Good thing they are easy to make, another batch is never too far away.


ONE MINUTE CHOCOLATE CAKE


One-Minute Chocolate Cake!

If you tried to sum up my blog in a dessert, this cake would be it: healthy–while still tasting ridiculously delicious, vegan (with a gluten-free option), and chocolate. Of course, chocolate. It wouldn’t be my blog without chocolate.
chocolate cake for one

One-Minute Chocolate Cake
(can be gluten-free!)
It’s also a new Single-Serving Recipe.
  • 1 tablespoon plus 2 tsp cocoa powder
  • 3 tablespoons spelt flour (or white, or Arrowhead Mills gf)
  • 1/8 tsp salt
  • 2 tsp sugar or evaporated cane juice (edit: xylitol works as well)
  • 1/4 tsp baking powder
  • 1 stevia packet (or 1 tablespoon more sugar)
  • 2-3 tsp coconut oil or vegetable oil (Edit: many commenters have said it still tastes good if you sub applesauce or mashed banana. But I can’t personally vouch for the results if you make that substitution.)
  • 3 tablespoons milk of choice (I used almond milk)
  • 1/2 tsp pure vanilla extract
Combine dry ingredients and mix very, very well. Add liquid, stir, then transfer to a little dish, ramekin, or even a coffee mug. Microwave 30-40 seconds. If you don’t want to eat it straight out of the dish, be sure to spray your dish first (and then wait for it to cool before trying to remove it).
If desired, top with my favorite Reeses Fudge Frosting.
chocoholic cake

Question of the Day:

Can you think of a better way to spend one minute?
Better than making chocolate cake? Is this a trick question? :)
And thank you all again. So so much.
Edit: Due to (very) popular demand, I’m finally adding the nutrition facts for this recipe.
Nutritional Info:
  • Calories: 205 with oil (or 140 without)
  • Fat: 12g with oil (or 2g without)
  • Carbs: 30g
  • Fiber: 6.5g
  • Protein: 5.5g
  • ww points (new system): 6 (or 4 without oil)

BUTTERMILK PIE

From my daughter Leslie from Foodie TV on facebook...................
This pie is alittle different than the one our Nenee made, but Im sure its still as good.   The family loves this pie, and it is soooooo rich!!!   That makes me hungry for one.
Warm it up in the microwave then add a big scoop of ice cream on top.   Perfect!!!


Buttermilk Pie 

Ingredients:

1/2 C. buttermilk
1 3/4 C. sugar
2 large eggs
3 T. flour
pinch of salt
1 stick butter or margarine melted
1 t. vanilla
nutmeg

Directions:

Preheat oven to 400 degrees F. 

Mix everything together and pour into an unbaked 9" pie shell.  Sprinkle the top lightly with fresh nutmeg.  Bake 15 minutes at 400 degrees.  Reduce to 350 degrees and bake about 45 minutes longer.
Cool to allow the filling to set. 

This pie is rich,  you could use a little less sugar and add 1 T. more flour.
NOTE:  This is the way the recipe is written.  I have sometimes reduced the sugar by 2 T. and increased the flour.


Buttermilk Pie

Ingredients:

1/2 C. buttermilk
1 3/4 C. sugar
2 large eggs
3 T. flour
pinch of salt
1 stick butter or margarine melted
1 t. vanilla
nutmeg

Directions:

Preheat oven to 400 degrees F.

Mix everything together and pour into an unbaked 9" pie shell. Sprinkle the top lightly with fresh nutmeg. Bake 15 minutes at 400 degrees. Reduce to 350 degrees and bake about 45 minutes longer.
Cool to allow the filling to set.

This pie is rich, you could use a little less sugar and add 1 T. more flour.
NOTE: This is the way the recipe is written. I have sometimes reduced the sugar by 2 T. and increased the flour